
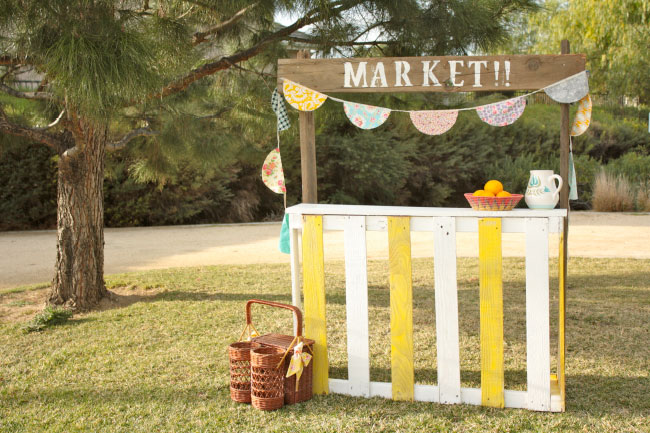
My Little Market
My husband brought home a pre-made fence for our garden and we ended up not using it. I’ve been brainstorming ideas on what to make with it. My kids have been begging for a lemonade stand for quite some time, but I didn’t want the stand to be tied down to just lemonade.
I was thinking how much my daughter’s imagination has grown since turning 4 and the possibilities for a market were limitless.
I was almost giddy putting this stand together, dreaming of the fun times to be made, the cookies to bake, the lemonade to squeeze, and the friends we’ll share this with.
Supply List:
- Drill
- Level
- 1″x10″ board
- C-clamps
- Hammer
- Screws (3″ and 2″)
- Pre-made fence (1) or pallets (2)
- Saw (jigsaw)
- Safety glasses
- (3) 1″x5″ recycled wood, about 57″
- Paint
- Stencils (optional)
To build this little market, you will need a pre-made fence (they come in sections about 10 feet wide, but you will have extra), or two pallets.
The instructions below are based on the fence, since that is what I used, but don’t limit yourself. Feel free to be creative and don’t be scared; if you mess it up, you can always take it apart.
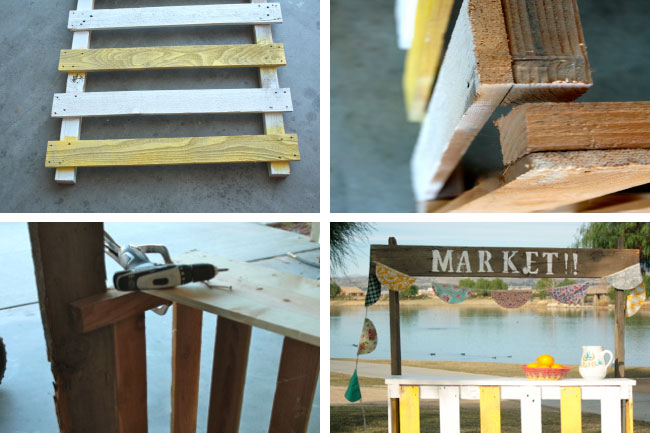
I cut my fence using a jigsaw because that’s all I had on hand. I measured my fence 41.5″ leaving 1.5″ on each side of the supporter boards my planks are nailed to. This is an important step because that’s what the sides will be screwed to in order to make your frame.
Saw off the ends of the fencing planks, making them flush with the supporting boards. (Make sure you don’t put your hands in front of the saw while holding the wood; they should always be on the side, so if you slip you’ll never be in contact with the blade.) Each board should be cut individually.
Now you’re going to cut your sides. Take the remaining fence and cut 2 pieces 14.5″. You will have to take a board/plank out on each side, leaving 4.5″ on each end. Then you will cut the fencing planks again, making them flush with the supporting board. You can use a hammer to remove the planks.
Now you’re going to assemble your frame. Prop your fence up and place the sides at each end of the fence. I used 2 C-clamps to hold the side together with the front, then used a level to straighten everything out. After I was satisfied with how level it was, I screwed each side together with the front using 3″ screws.
Now it’s time for the counter of your market. I took my 1″x10″ board and cut it 43.75″ long. Then I placed it on top of my fencing, which is now the market frame. I started on the top of the board using my 2″ screws and screwed one on each corner, going down into my 1″x2″ frame.
Ta-da! You now have a stand. You remember those 4.5″ ends I made you leave on the sides? Well those are where the supporting boards will be nailed to for our sign. They’re the 1″x6″ boards that should be about 57″ in length. Cut accordingly. I used some barn wood we saved from an old hay trailer.
Screw your boards into the ends of your frame, making your market sturdier. Make sure you use a level and align these correctly.
You’re almost done! If you’ve gotten this far you should be proud of yourself. Now you’re going to take your second 1″x6″ board and cut it 50″ long. Take that board and screw into the boards we just nailed into the frame for our sign.
I got stencils I had lying around from Michaels and painted the “Market” on my board. I used interior satin white paint I had left over. I used that paint for the stand as well.
You’re done! I want to encourage you to have fun with it. It doesn’t have to be perfect. You don’t have to do everything exactly how I did it; make it your own!


4 comments
Cathe | February 26, 2014
That's is so adorable! What a great idea...now, what's for sale cuz I'd buy it!
Leave a comment
Lisa Robbins | February 27, 2014
What a great idea. I want my husband to make one for our granddaughters. Thanks for sharing.
Leave a comment
Vicky Simon | March 12, 2014
What a beautiful and chic idea for the spring! Absolutely lovely, thanks for the post!
Leave a comment
Cami | March 27, 2014
This is just too cute for words!
Leave a comment
Leave a comment